
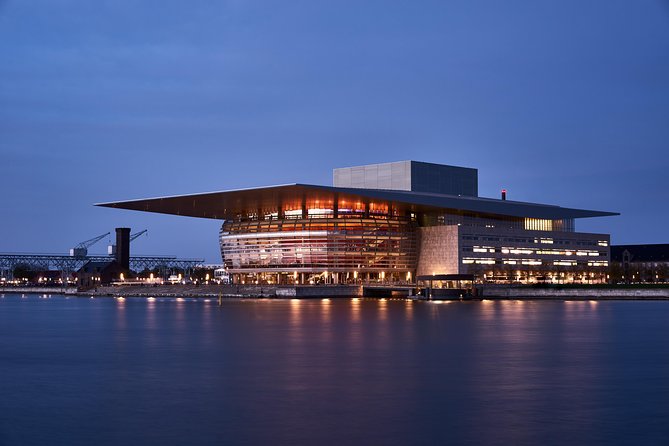
Reviewed · CITY TOURS
Copenhagen City Of Lights PhotoWalks Tour
What makes the Copenhagen City of Lights PhotoWalks tour interesting is its timing. You’re out when the city shifts from evening calm to city-light glow, right around the blue hour. It’s not just sightseeing with a camera, it’s a guided way to understand what the light is doing and how to capture it.
I especially like the private, guide-focused format, where your instructor can adjust to your camera and comfort level. I also like that the lesson stays practical, with hands-on help for composition and exposure and time spent on settings like aperture, shutter speed, and ISO. One consideration is that the tour requires a tripod since you’ll be doing longer exposures, and timing can feel slightly different depending on how long it stays bright in the season.
Key highlights worth knowing
- A private photo walk with full attention from a professional photographer guide
- Blue hour to night timing for moody, atmospheric city-light photos
- Manual camera instruction (aperture, shutter speed, ISO) built into the walk
- Long-exposure practice paired with composition tips like perspective, lines, and color
- Photo stops at major Copenhagen icons such as Nyhavn, the Opera House, and more
- Tripod required so you can actually get the night look you came for
Why Copenhagen’s City Lights Work So Well for Night Photos
Copenhagen has a gift for night photography: the light is varied and it stays interesting. You’re dealing with reflections off building fronts, harbor-adjacent drama near Nyhavn, and crisp highlights on civic architecture. When the sky turns properly dark, the city lights can look soft and cinematic, not harsh.
The tour is designed around that change in mood. You head out just before sunset and work through the transition between the blue hour and full night. That matters because your camera settings need to follow the light, and your eye needs time to adjust too. A guide helps you translate what you see into the settings that make it happen.
A few more Copenhagen options worth comparing
- Copenhagen Card-Discover: 80+ Attractions & Public Transport
★ 4.6 · 5,351 reviews - Copenhagen: Hop-On Hop-Off Bus Tour with Boat Tour Option
★ 3.9 · 4,122 reviews - Private Walking Grand Tour of Copenhagen
★ 5.0 · 3,953 reviews
Private Photo Guidance That Actually Changes Your Results
This is a private photography tour, so you get more than general tips. Your photographer guide is fully focused on you, and you can bring up to three friends or family members within the same price. That flexibility helps if you’re learning together, but you still won’t be stuck in a big group moving on without feedback.
I like how the instruction is framed around confidence. You’re not just told what to shoot, you’re taught the why behind exposure and composition. You also get help with real camera decisions, not vague advice that only works in theory.
Your 3-Hour PhotoWalk Route, From Nyhavn to Kongens Nytorv Metro
The walk runs about 3 hours and ends where it starts, near the Metro station at Kongens Nytorv. Your meeting point is Memorial Anchor, Nyhavn 1F, 1051 København, Denmark, and the activity finishes back at that meeting spot.
That pacing is good for learning. You have enough time to slow down, set up, shoot, review, and reset as the light changes. It also keeps the route simple, so you’re not spending your energy on transfers or map stress.
The Key Teaching Moment: Shooting Between Blue Hour and Full Night
The tour centers on a specific photographic window. Right before the sun sets, the city can look gentle and pastel. Then the city lights come on, and suddenly the scene becomes moodier, with stronger contrasts, reflections, and colorful signage-like lighting.
You’ll learn the technical side of that transition. Your guide will walk you through manual settings like aperture, shutter speed, and ISO, and then help you apply them on location. This is where night photography becomes less mysterious, because you see how one change affects the whole frame.
A different shape of day in Copenhagen:
- From Copenhagen: Lund and Malmö 2-Country Tour
★ 4.7 · 3,807 reviews - Copenhagen Highlights Walking Tour
★ 5.0 · 2,324 reviews - Copenhagen: Highlights 3 Hour Bike Tour with a Local Guide
★ 4.8 · 2,312 reviews - Hamlet and Sweden Tour – Two Countries in one day !
★ 5.0 · 2,223 reviews
Nyhavn and Copenhagen Icons You’ll Target for Night Glow
You’ll photograph major landmarks that already look great with lights on. The goal isn’t just to get a pretty postcard, it’s to help you find angles that use light and composition to your advantage.
Here are the kinds of stops you can expect to work into your shots:
- Nyhavn: famous old houses with the lights on, plus reflections and a strong sense of place
- The Queen’s Palace: architectural shapes that respond well to night contrast
- The Opera House: clean lines that can look striking when lights outline edges
- The Parliament: a civic, dramatic backdrop when illuminated
Your guide will also help you focus on viewpoints and exposure choices for each area. That is especially helpful if you’ve ever felt like your camera gives you a darker image than what you see with your eyes.
Manual Settings for Night Photography, Explained in Real Use
The tour explicitly teaches manual camera settings: aperture, shutter speed, and ISO. Even if you already understand these terms, you’ll likely benefit from applying them under real city-light conditions, not in a controlled lab setting.
Here’s how this lesson typically becomes useful fast:
- Aperture helps control sharpness and how much light you let in.
- Shutter speed controls the night look, including how light trails or glow streaks appear.
- ISO determines how bright your image is, and also affects noise.
You’ll also work with long shutter speeds and learn how they relate to the scene. This is one of the best parts of night photography instruction because long exposures turn ordinary street lighting into something more dramatic. Your guide’s feedback helps you aim for the look you want, instead of guessing and hoping.
Composition Tips: Perspective, Lines, and Color Under Streetlights
Night photography is not only settings, it’s also composition. The tour includes creative composition coaching using tools like perspective, lines, and color. That sounds broad, but on a city walk it becomes concrete.
You’ll get help finding frames where:
- lines lead your eye toward a landmark or light source
- perspective makes buildings feel deeper and more dimensional
- color in the scene helps tell the story of night atmosphere
This is exactly where a professional guide helps. They can point out angles you might walk past, and they can steer you toward a composition that looks intentional even if it’s shot handheld in early evening. Then, when you switch to tripod work, your results usually jump.
Post-Processing Tips for Better Night Results
The tour includes tips for post-processing. I like that this is included because night photos often need a little extra love to look right. You might have a technically correct image that still needs small adjustments for contrast, color balance, or exposure feel.
To get the most out of this part, be ready to ask what you personally use to edit your photos. If you shoot on a phone, you’ll want guidance that matches your workflow. If you shoot a camera, you’ll want suggestions aligned with manual night files.
The Tripod Requirement, and Why It Changes Everything
You’ll be doing longer exposures, so you must bring a tripod. That’s not a nice-to-have. If you try long shutter speeds without proper stabilization, your images can blur and your whole night look gets ruined.
This is the one practical hurdle to plan for. If you’re traveling light, pack-thinking helps: keep the tripod compact if possible, protect it from wind, and set it up efficiently before the best light window disappears. The payoff is big, because longer exposures are how you get smoother light trails, steadier outlines, and a more controlled night mood.
Weather, Timing, and What It Means for Your Shots
The tour operates in all weather conditions, so dress appropriately. I like that this isn’t treated as optional. Copenhagen evenings can shift fast, and city-light photography often benefits from cloudy or slightly damp air because reflections can look richer.
Timing is another factor to watch. One caution from experience is that Copenhagen can stay bright later than you might expect in some seasons. If it’s still fairly light after your planned start window, your “night” photos might look more like late evening. The fix is simple: trust the guide’s timing and focus on the guide-directed shooting sequence rather than the clock alone.
What the Tour Feels Like: Pace, Feedback, and Patience
A private photo walk should feel calm, not rushed. The best moments come when you’re allowed to try a setting, see what it does, then adjust. This tour is built around that rhythm, and the guide’s patience matters, especially if you’re new to manual mode.
If you’ve struggled with getting your camera to do what you want, this format can be a relief. Instead of wrestling with settings alone, you’ll get help in the moment. That feedback loop is one reason night photography lessons can change your skills faster than reading alone.
Price and Value: Is $233.63 Worth It?
At $233.63 per person for about 3 hours, this is not a cheap activity. But it can be good value if you compare it to what you’d otherwise need to pay for: time, a knowledgeable instructor, and a route built around night conditions.
Here’s where the value really comes from:
- You get a professional photographer guide focused on your camera and questions.
- You get a structured lesson on manual settings and long exposures, not just photo walks.
- You get major Copenhagen photo targets like Nyhavn and the Opera House, handled with guidance on angles and exposure.
If you’re already fully confident with manual settings and long exposures, you might feel like you’re paying mostly for access to prime locations and a private pace. If you’re still learning, or your photos often come out darker, noisier, or less dramatic than you expect, the instruction is the part you’ll feel most strongly.
Who This Tour Suits Best
This tour is a strong fit if:
- you want to improve night photography in a practical way
- you’re curious about manual settings like aperture, shutter speed, and ISO
- you want help with composition choices, not only technical settings
- you’re comfortable carrying a tripod for the duration
It’s also a good match for couples or small friend groups who want a shared experience with individual attention. And it works for both newer photographers and more experienced ones, since the guide is meant to tailor the instruction to your personal needs.
Should You Book This Copenhagen City of Lights PhotoWalk?
Book it if you want a guided way to turn Copenhagen’s night lighting into photos you actually like. The biggest reasons to say yes are the private, focused instruction and the emphasis on hands-on night photography skills like long shutter speeds, composition, and exposure control.
Skip or reconsider if you’re not willing to carry a tripod, or if you only want casual sightseeing without camera coaching. Also, keep your expectations flexible about how dark it feels, since the city can stay bright depending on the season.
If your goal is better results, not just more pictures, this tour is the kind of learning-by-doing that pays off quickly.
FAQ
Where do we meet for the Copenhagen City of Lights PhotoWalks tour?
You meet at Memorial Anchor, Nyhavn 1F, 1051 København, Denmark.
How long is the tour?
The tour lasts about 3 hours.
Is the tour private?
Yes. It is a private tour, so only your group participates.
Can I bring friends or family?
Yes. Even though it is private, you can bring up to 3 friends or family members included in the price.
What language is the tour offered in?
The tour is offered in English.
Do I need a tripod?
Yes. The tour requires you to bring a tripod because you will be doing longer exposures.
What camera skills does the guide help with?
You will learn manual camera settings including aperture, shutter speed, and ISO, plus tips for creative composition and exposure at night.
Which landmarks will we photograph?
You’ll have the chance to photograph places such as Nyhavn, the Queen’s palace, the Opera House, and the parliament, plus other sites along the walk.
What is included in the price?
The included items are a private photography tour and a professional photographer guide.
Does it run in bad weather?
Yes. It operates in all weather conditions, so dress appropriately.
Can I cancel and get a refund?
Yes. You can cancel for free up to 24 hours in advance for a full refund. If you cancel less than 24 hours before the start time, the amount paid is not refunded.
Recently reviewed around Copenhagen
- The Forgotten Giants Private Tour★ 5.0 · 3 reviews
- Explore Copenhagen in 60 minutes with a Local★ 5.0 · 3 reviews
- E-Scooter guided tours in Wonderful Copenhagen★ 5.0 · 3 reviews
- E Biking Adventure to Kronborg Castle★ 5.0 · 3 reviews
- Danish Design Classic and Modern Style Self-Guided Audio Tour★ 5.0 · 3 reviews
- Departure by Luxury Vehicule Copenhagen to Copenhagen airport CPH★ 5.0 · 3 reviews
- Copenhagen: Self Guided Scavenger Hunt and Tour★ 4.0 · 3 reviews
- Mikkeller Tastings – The Unusual Story of Beer and Mikkeller★ 5.0 · 3 reviews
City Tours, compared.
Group Walking Tour – City Highlights – 2 Hours
Read our review →
City Sightseeing Copenhagen Hop-On Hop-Off Bus Tour
Read our review →
City Card with 40+ Attractions & Hop-On/Off Bus
Read our review →
Browse the lists this tour appears in